


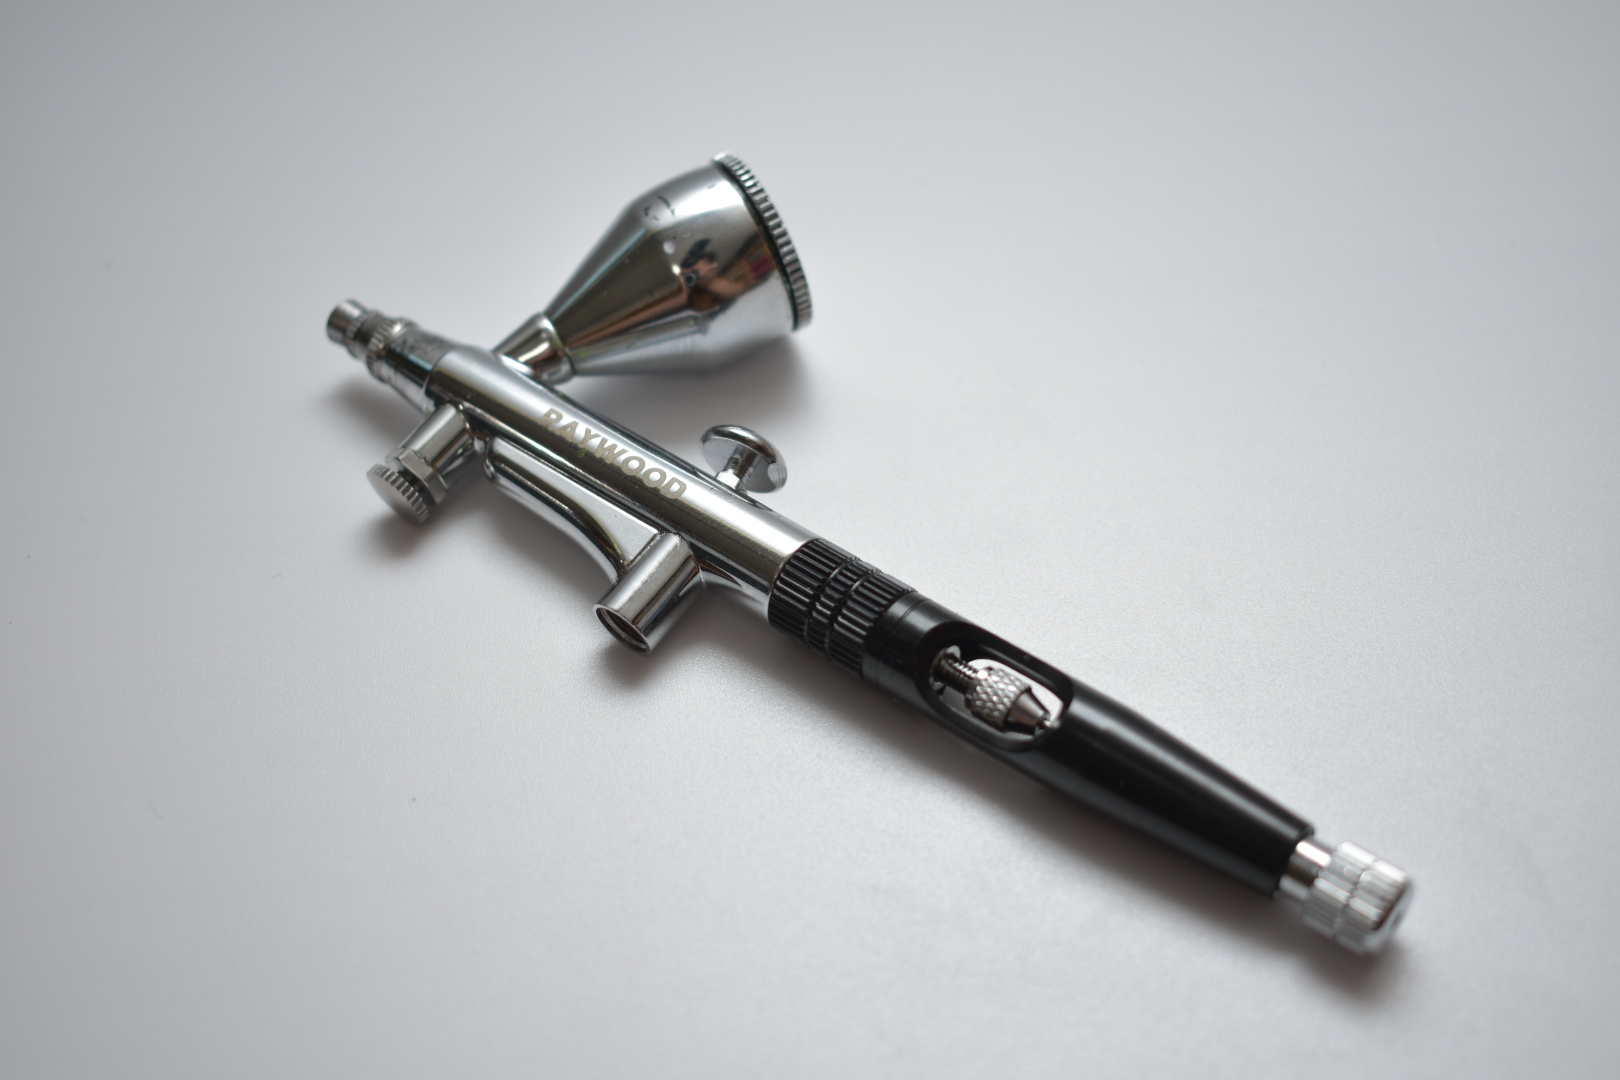
airbrush
Frequently asked questions and inquiries
[RS-1, TR-02] Cannot charge the battery
Be sure to charge the battery included with the rechargeable compressor using the included white cable.
If you use a non-OEM cable,
Charging is not performed normally. "The battery level does not light up while charging" and "The compressor does not work"
There is a risk of malfunctions such as:
[RS-1, TR-02] I want to connect a hose to the compressor
Please insert the following joint between the compressor and the hose.
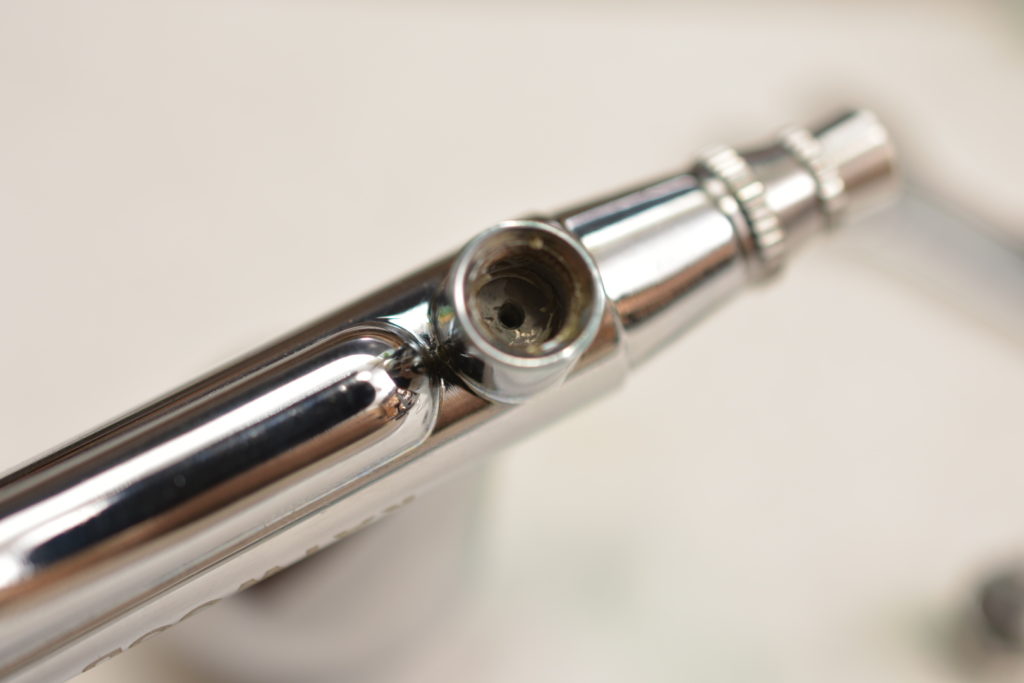
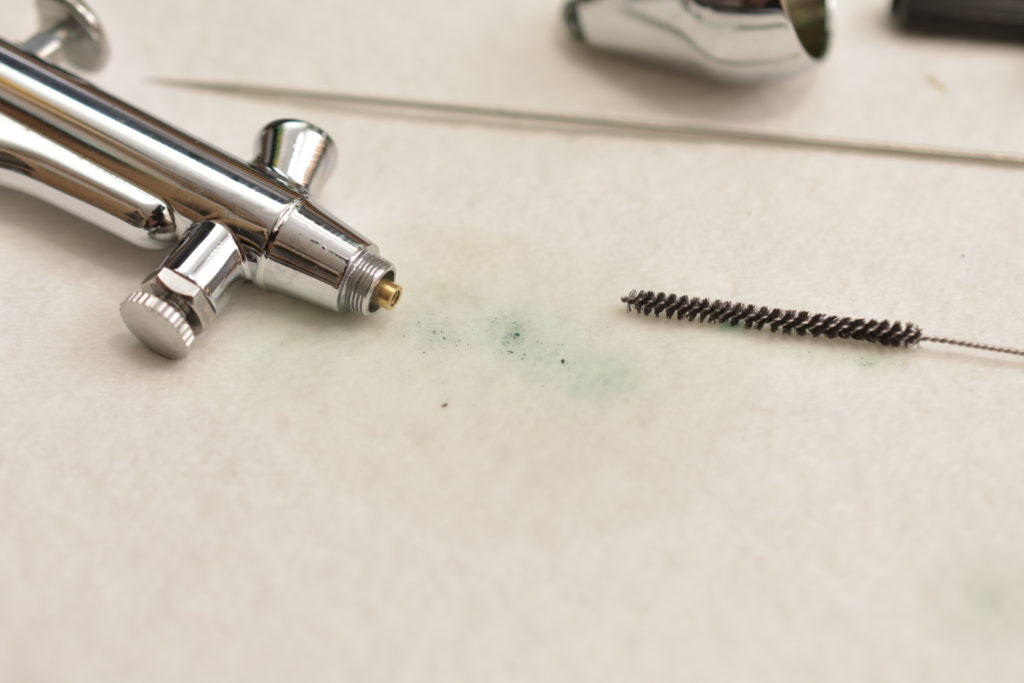
The joint parts cannot be removed
Once the joint parts are attached, they are difficult to remove due to the air pressure, but if you firmly grip them with pliers or something similar and turn them, they can be removed relatively easily.
If you pinch the product with pliers, the plating may come off, but this can be reduced by pinching the product with cloth or paper. We ask for your understanding in any minor scratches that may still occur.
*If you don't mind the plating peeling off, it may be easier to remove the joint parts by firmly gripping them with pliers or something similar and turning them, rather than using a cloth or other material between them.
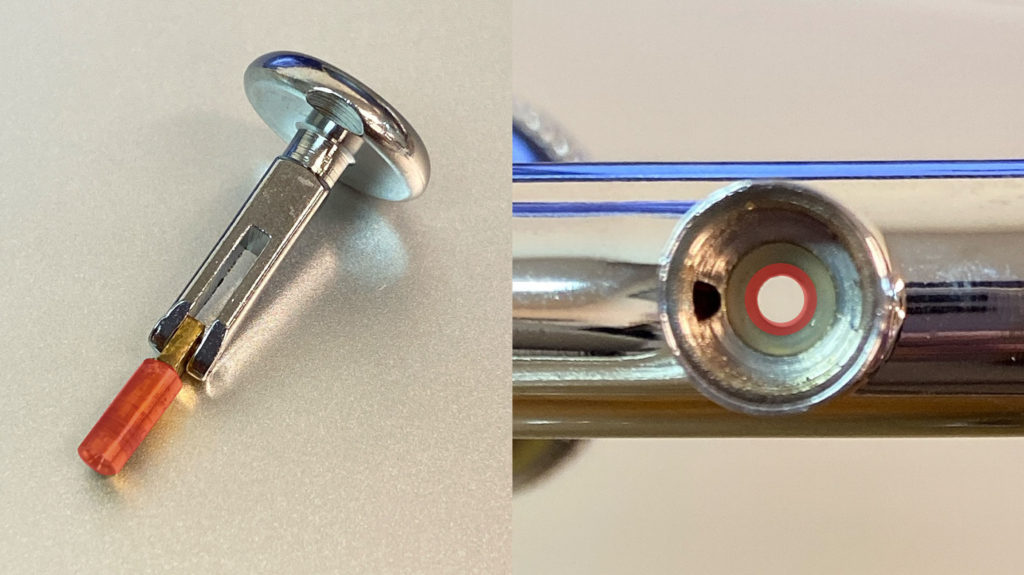
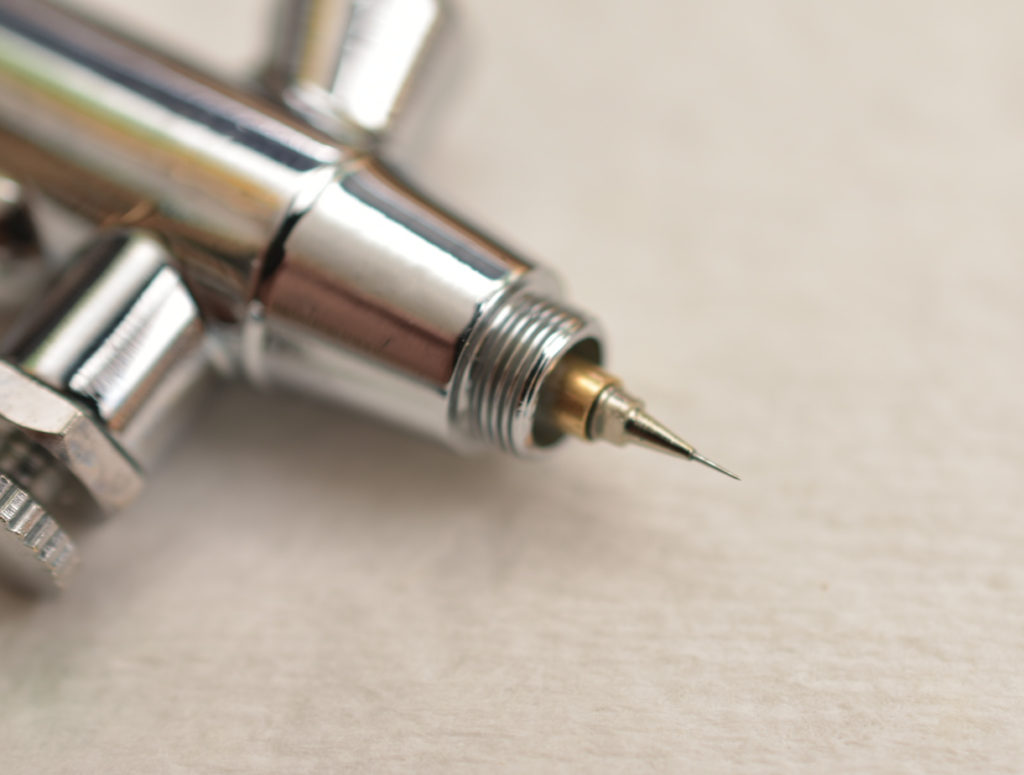
Trigger button does not return well
I think there may be a lack of grease around the trigger.
The rod at the bottom of the trigger is designed to move up and down by passing through a circular rubber ring called an "O-ring" to ensure airtightness, but if the O-ring is new, it may occasionally become stiff until it breaks in.
Please try the following two steps.
① Move the trigger rod up and down by hand several times to break in the moving parts.
②If the problem persists, apply airbrush maintenance grease or spray-type grease such as KURE 5-56 to the gold part of the trigger and the lower rod part (inside the O-ring) (red part in the image below).
Paint cup lid won't open
It seems that the lid of the included paint cup may become stuck due to air pressure changes during shipping.
Please try the following solutions:
- Gently pull the lid up without rotating it.
- Warm the cup and lid with a hot, steamed towel.
- Wrap the cup in a towel and use a pair of wide-open pliers to pull the lid off from directly above.
*Other users have reported that they were able to open it easily by tapping it lightly with a rubber hammer to give it some vibration.
We cannot be held responsible if the product becomes distorted due to being struck.
About diluting paint
When spraying paint sold by various manufacturers with an airbrush, it is necessary to dilute the paint rather than using it as is.
This is only a guideline as it will vary depending on the type and ingredients, the diameter of the airbrush nozzle, the air pressure, and how long it has been since it was opened, but generally the ratio is about 2 to 3 parts solvent to 1 part paint.
In practice, the solvent is added with a dropper and mixed with a mixing stick to fine-tune the concentration.
Apply the paint to the edge of the plate so that it drips a little (it's best when it has the same viscosity as milk).
In addition, we recommend that you always use the paint in conjunction with the dedicated thinner (solvent) provided by each paint manufacturer.
*Please be careful when adding water to lacquer-based paints before use or trying to wash them with water after use, as they will harden.
* Metallic colors, surfacers under #1200, top coats, and special water-based paints such as acrylics are difficult to use because the pressure of our 0.3mm diameter handpiece and 22PSI compressor is weak and large particles tend to clog the nozzle.
If you are unable to dilute the paint properly and it becomes clogged, please refer to the video below to disassemble and clean it.
If the problem persists even after disassembly and cleaning, we also sell the handpiece separately, so please purchase one.
We also provide inspection and repair services for a fee, so if you would like this service, please contact us using the information below, and state your order number at the time of purchase.
<Caution>
*We do not respond to inquiries by phone.
* Reception hours are from 8:30am to 4pm on weekdays, and closed on Saturdays, Sundays, and holidays.
If you contact us outside of business hours or on weekends or holidays, we will respond on the next business day.
Precautions and checkpoints for handling handpieces
Please see the video we have created regarding how to handle the handpiece, precautions to take, and how to adjust each part.
#001 Tech Liner Series "From taking it out of the box to trying it out"
*This time we are using the TechLiner series, but the same applies to other series.
#002 Tech Liner Series "Adjustment and operation of each part" ~Adjustment of air adjuster, needle position, needle stopper~
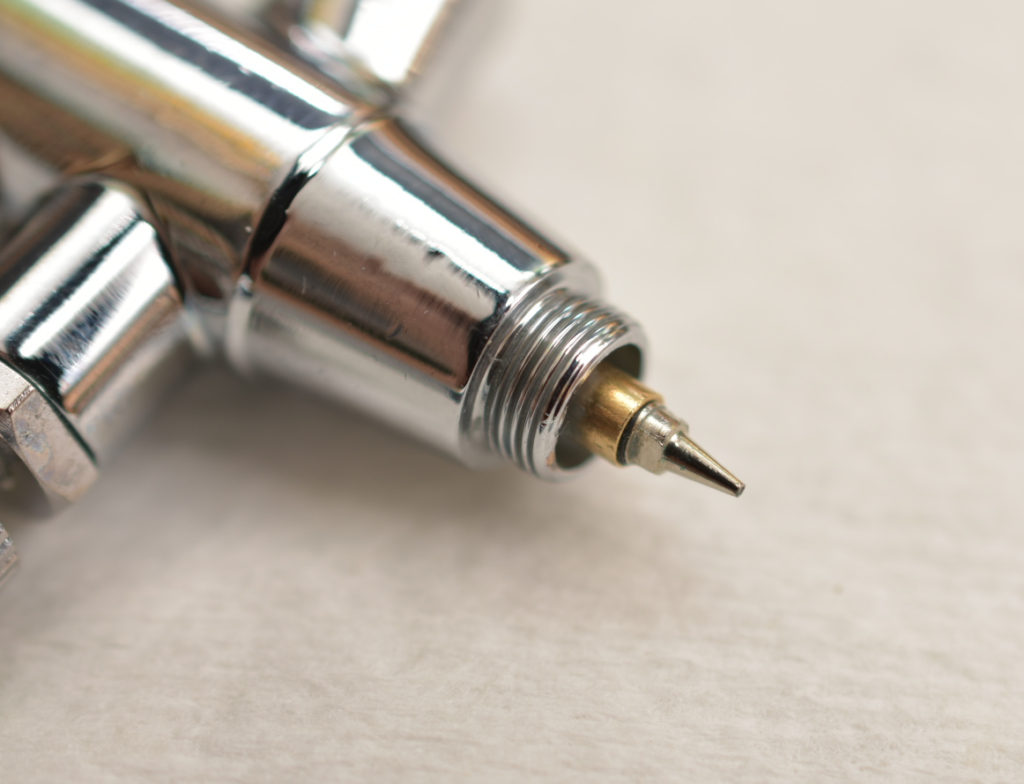
I would like to know the diameter of the connection part of the handpiece and rechargeable compressor.
The diameter of the connection part (joint part) of the paint cup is "M6x0.75".
Other diameters
Compressor top (except RS-1): M7X0.5
Compressor top (RS-1): 1/8 (S)
Handpiece connection part: M7X0.5
We also sell special joints for connecting to hoses and handpieces made by other companies.
Regarding requests for repairs and inspections
Please check the FAQ and try to repair it yourself.
If the situation does not improve after trying
Please contact our customer support with the necessary information.
*This service will be subject to a fee.
*We do not repair compressors.
<Required items>
- Request for inspection/repair
・Order number from official website, etc.
・Delivery address, postal code, name, and phone number
Details of the symptoms you are experiencing.
<Caution>
*We do not respond to inquiries by phone.
* Reception hours are from 8:30am to 4pm on weekdays, and closed on Saturdays, Sundays, and holidays.
If you contact us outside of business hours or on weekends or holidays, we will respond on the next business day.
Suddenly the paint got clogged.
After opening the product, we ask that you first check that all functions are working properly.
Be sure to use a solvent or cleaning fluid to check this operation.
If you use paint suddenly, the paint may not come out.
Is there a problem with the way the paint is used, such as diluting it?
It becomes difficult to determine whether there is a problem with the handpiece adjustment.
If you check the operation with paint and find that it is clogged, disassemble and clean it.
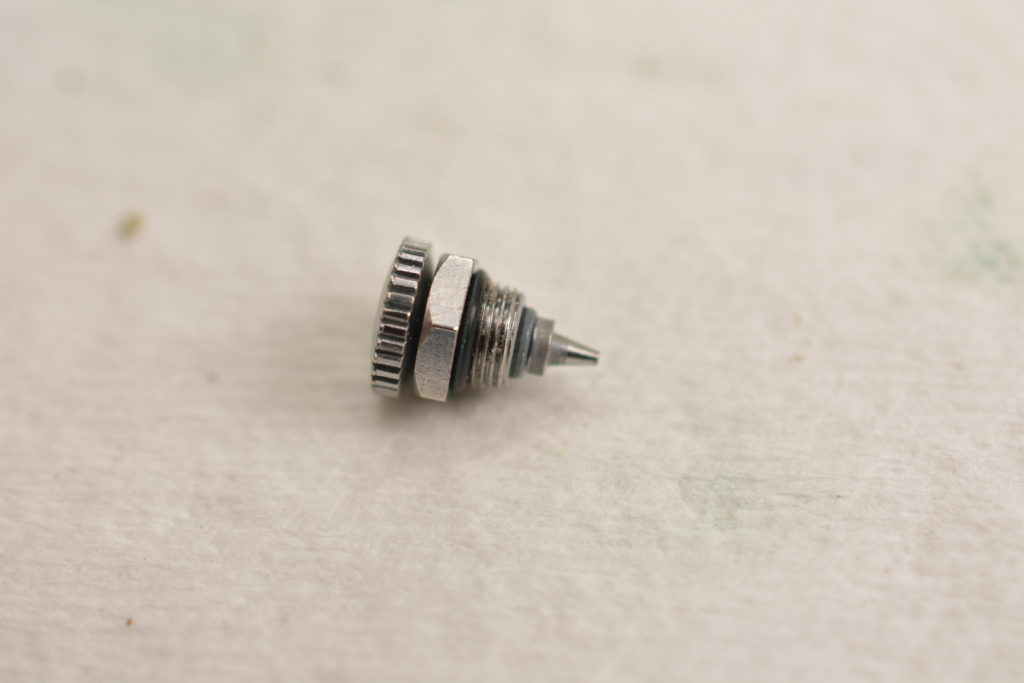
I would like to know the corresponding O-ring set.
→Compatible with TH-A01, TH-B01, TH-C01, and TH-T01.
Disassembly and cleaning
Gargling and Cleansing
"Gargle cleaning" is a very simple method to clean the inside of the handpiece cup. It is mainly done every time you change the color (paint) inside the cup.
*Please note that this does not remove paint stains from the inside of the handpiece.
*When you finish painting, please clean with a "tool cleaner" that is stronger than regular thinners. Please prepare a dedicated "tool cleaner" that matches the paint you are using.
1) Remove the paint cup lid and return any remaining paint to the paint container or discard it.
② Use tissue to wipe off any paint remaining on the inside of the paint cup.
③ Pour a small amount of cleaning solution into the paint cup. Using a dropper makes it easier to work reliably. After pouring, close the lid to prevent paint and cleaning solution from splashing. It is enough to have a small amount of solvent at the bottom of the paint cup.
④ Hold the tip of the handpiece with your fingers or loosen the nozzle cap 1 to 2 turns to prevent air from escaping.
5. Just like when painting, when you press the trigger, air flows back and bubbles appear in the paint cup. This process is commonly referred to as "rinsing" the airbrush.
⑥ Gargling will bring out the paint stains inside the handpiece. Gargle for a few seconds and repeat this process 2-3 times. Once the paint stains have been sufficiently removed, wipe off the cleaning solution with tissue or discard it.
⑦ If you have an old brush or cotton swab, you can soak it in cleaning solution and scrub the inside of the cup to clean it efficiently.
⑧ Wipe off any cleaning solution or paint on the inside of the paint cup with tissue or similar.
⑨ Repeat steps ① to ⑧ several times, while occasionally spraying a small amount of cleaning solution onto a tissue or similar to check if any paint color remains. Repeat until the dirt inside is sufficiently removed and no paint color remains even after spraying with cleaning solution. *The appropriate number of times will vary depending on the type of paint and the degree of dilution.
10. Finally, blow off all the cleaning solution.
*Please note that lacquer-based paints will harden if washed with water after use. Be sure to use a dedicated solvent (thinner/cleaning agent) for each paint.
*As mentioned above, the handpiece will not be cleaned by simply rinsing it repeatedly. It is necessary to disassemble and clean (overhaul) the handpiece after every few uses to thoroughly remove any paint stains that may have built up inside it.
If you have any questions, please contact us using the information below.
<Caution>
*We do not respond to inquiries by phone.
* Reception hours are from 8:30am to 4pm on weekdays, and closed on Saturdays, Sundays, and holidays.
If you contact us outside of business hours or on weekends or holidays, we will respond on the next business day.
How to Assemble the Handpiece
We have a video explaining how to assemble the handpiece, so please watch it from around 55:37 below.
<Caution>
*We do not respond to inquiries by phone.
* Reception hours are from 8:30am to 4pm on weekdays, and closed on Saturdays, Sundays, and holidays.
If you contact us outside of business hours or on weekends or holidays, we will respond on the next business day.
Disassembly and cleaning (overhaul) procedure
Please see the video above for instructions on how to disassemble and clean the unit.
*Each manufacturer sells "tool cleaners" that are stronger than regular thinners. Please prepare a dedicated "tool cleaner" that matches the paint you are using.
・Cleaning of parts
Once the parts have been disassembled, clean the small areas. Use thinner and tool cleaner to thoroughly clean each part with a cleaner brush or toothbrush. Wipe the needle and body with tissue or paper towel soaked in thinner.
- Cleaning the nozzle by soaking
If there is any dirt stuck in the nozzle that cannot be removed, soak it in parts cleaner (known as soaking it in a drain), and after a while, scrub off the dirt with a brush or similar.
Rubber O-rings (gaskets) will deteriorate, so please remove any that can be removed before soaking.
If you soak something in tool cleaner, be sure to dry it thoroughly afterwards.
- Apply grease to each part
Finally, applying a "sealant" to the threads of the nozzle and "grease" to moving parts such as the trigger button will improve movement significantly. You can also adjust the pull of the trigger button by applying grease.
If you have any questions about the video, please feel free to contact us using the form below.
<Caution>
*We do not respond to inquiries by phone.
* Reception hours are from 8:30am to 4pm on weekdays, and closed on Saturdays, Sundays, and holidays.
If you contact us outside of business hours or on weekends or holidays, we will respond on the next business day.
How to disassemble the handpiece
Please watch the first 20 minutes of the video below to see how to disassemble the handpiece.
<Caution>
*We do not respond to inquiries by phone.
* Reception hours are from 8:30am to 4pm on weekdays, and closed on Saturdays, Sundays, and holidays.
If you contact us outside of business hours or on weekends or holidays, we will respond on the next business day.
Handpiece exploded view and part names

troubleshooting
Gargle
1. Nozzle, nozzle cap, or head assembly is loose.
If the head assembly is even slightly loose, air will flow back and cause a gargling sound.
First, make sure to tighten the head assembly securely.
If the problem persists, please check to see if any of the assembly parts (nozzle, nozzle cap, needle cap, head) are loose.
2. Dirt on the handpiece
Is there any paint remaining on the nozzle cap or needle tip?
■Is the tip of the nozzle clogged with paint? Is the nozzle cracked or deformed?
■Does the nozzle come with an O-ring? Is it cracked or deteriorated?
■Is the needle bent or dirty?
*Please be careful not to tighten the nozzle too much as it will easily break.
In some cases the problem can be solved by disassembling and cleaning the entire unit or by replacing the nozzle and needle with new ones, so please refer to this.
3. The needle pull is small
If the needle stopper or spring case is tightened too much,
This reduces the needle's travel and causes air to flow back.
If you find yourself gargling, try loosening it a little.
Also, if the needle guide is too tight,
The needle will be tightened and will not move easily.
Please loosen this a little as well.
4. Paint dilution
Paint dilution varies depending on the type and ingredients.
Apply the paint to the edge of the plate so that it drips a little (it's best when it has the same viscosity as milk).
As a rough guideline, dilute the paint with 1 part paint to 2 to 3 parts solvent, add the solvent with a dropper, and mix with the mixing stick to fine-tune the concentration.
*Please be careful when adding water to lacquer-based paints before use or trying to wash them with water after use, as they will harden.
*Please note that special water-based paints such as metallic colors, surfacers (1200 grit or less), top coats, and acrylics do not have enough pressure with this 0.3mm diameter handpiece and 22 PSI compressor, and large particles may clog the paint, so care must be taken when using these paints.
It seems that anyone who is familiar with paints and has considerable experience with airbrushes should be able to spray it, if at all.
We also have a video explaining how to dilute the product, so please take a look if you are interested.
5. The center is off.
Center misalignment occurs when the nozzle base (the gold part where the nozzle is attached) is bent.
The base bends so that the needle comes into contact with the nozzle,
As a result, the air passage becomes blocked and causes backflow.
When removing parts (especially nozzles and head assemblies) with force,
The nozzle base is easily deformed, so please be careful not to use too much force when disassembling it.
We also have a nozzle center correction tool available, so please consider using it.
If the above steps do not solve the problem, we can inspect the problem for you, but this will incur a fee. If you would like to do this, please contact our support.
<Caution>
*We do not respond to inquiries by phone.
* Reception hours are from 8:30am to 4pm on weekdays, and closed on Saturdays, Sundays, and holidays.
If you contact us outside of business hours or on weekends or holidays, we will respond on the next business day.
[RS-1, TR-02] No air comes out
If the compressor does not emit air,
First, the battery charge may be low.
Always charge the battery using the included white charging cable.
Check the compressor operation again.
*Charging may not be possible if you use a non-brand cable.
Next, the compressor, air valve joint, and handpiece.
Check which one is causing the problem.
After charging the battery, please check the following three items.
① With nothing connected to the compressor,
Check that the compressor is running and blowing air.
If it does dispense, the problem is caused by the air valve joint or handpiece.
If it does not discharge, the drive mechanism inside the compressor may be damaged.
② (When discharging air using step ①)
With only the air valve joint connected to the compressor,
Check that air comes out when you press the protrusion on the top of the air valve joint.
If it does discharge, the problem is caused by the handpiece.
If the nozzle does not discharge, the air valve joint is stiff.
There may be paint blockage inside.
③ (When discharging air using step ②)
When the trigger button is pressed with the handpiece connected,
Check that air is coming out of the nozzle tip.
If the paint does not dispense, the paint may be clogged in the handpiece.
There may be a problem, such as the needle fixing nut not being tightened.
Please have it overhauled.
<Caution>
*We do not respond to inquiries by phone.
* Reception hours are from 8:30am to 4pm on weekdays, and closed on Saturdays, Sundays, and holidays.
If you contact us outside of business hours or on weekends or holidays, we will respond on the next business day.
The paint becomes clumpy
If the paint clumps, the main cause is likely to be the condition of the needle or dilution of the paint.
1. Needle condition
The needle may be dirty with paint or may be deformed.
First, check and clean the needle.
The tip of the needle can bend slightly if not handled with care. If this happens, we recommend purchasing a new one to replace it, as this will affect the paint spray.
*Needles are consumable items, so we recommend replacing them periodically.
We also sell repair kits that come with a set of three needles and three nozzles for the airbrushes we handle.
2. Adjusting the needle position
① Remove the needle stopper and handle by turning them counterclockwise.
② Turn the needle fixing nut counterclockwise to remove it.
③ The needle will be released and will be free to move.
In this state, move the needle backwards about 5 mm and then push it forward again until it stops firmly.
This will ensure the needle is in the correct position.
(*Please be careful not to push too hard as this may cause the nozzle to deform or become damaged.)
④ Reassemble in the reverse order of disassembly.
Be sure to tighten the needle fixing nut firmly to prevent the needle from slipping.
3. Adjusting the needle stopper
When you pull the trigger, the needle retracts and the paint sprays out.
The range of movement of this trigger and needle (the amount of paint sprayed) is adjusted with the needle stopper.
Turning it counterclockwise increases the pull, and turning it clockwise decreases it.
*Please adjust according to the application.
4. Paint dilution
The dilution ratio of paint varies depending on the type and ingredients, so it is just a rough guide, but the ratio is 1 part paint to 2 to 3 parts solvent. While adding the solvent with a dropper, mix with a color mixing stick to fine-tune the concentration. Apply the paint to the edge of the dish and it is best to have it drip a little (about the viscosity of milk).
*Please be careful when adding water to lacquer-based paints before use or trying to wash them with water after use, as they will harden.
*For special water-based paints such as metallic colors, surfacers (1200 grit or less), top coats, and acrylics, the pressure is weak when using a 0.3mm diameter handpiece and a 22PSI compressor, and large particles can easily become clogged.
Even those who are familiar with paints and have considerable experience with airbrushes will probably be able to apply this paint, if at all.
We also have a video explaining how to dilute the product, so please take a look if you are interested.
If the above steps do not solve the problem, we can inspect and repair the device for a fee. If you are interested, please contact our support.
<Caution>
*We do not respond to inquiries by phone.
* Reception hours are from 8:30am to 4pm on weekdays, and closed on Saturdays, Sundays, and holidays.
If you contact us outside of business hours or on weekends or holidays, we will respond on the next business day.
I just bought it but the paint won't come out
If the paint clumps, the main cause is likely to be the condition of the needle or dilution of the paint.
1. Check the air outlet
Make sure the needle cap and nozzle cap are both tightly tightened. Turn them clockwise to tighten. Finger-tightening both screws should be sufficient.
If the nozzle cap (head assembly) is not tightened properly, air may leak and paint may not come out.
2. Adjusting the air adjuster
You can adjust the air flow rate (strength) by turning the air adjuster. The more you turn it counterclockwise from the fully tightened position, the more the air flow rate will increase. The adjustment range is very strict, and it will reach its maximum in about one turn from the fully tightened position. It is usually used at its maximum setting. Please adjust it according to the purpose, such as when you want to spray finely or create a thin paint finish.
※Please note※
Be careful not to loosen the air adjuster too much. Although there may be slight individual differences, the maximum is reached when loosened one turn from the fully tightened position. Do not loosen it more than two turns. If it is used when it is too loose, it may not function properly.
3. Adjusting the needle position
If the needle is not in the correct position, it will not spray properly. Check if the mist is not clear. Remove the handpiece from the compressor before proceeding. Turn the needle stopper and handle counterclockwise to remove them. Turn the needle fixing nut counterclockwise to remove it. The needle will be released and will be free to move. In this state, move the needle backwards by about 5 mm, then push it forward again until it stops firmly.
* Doing this will ensure that the needle fits into the correct position.
Finally, put it back in the reverse order. Be sure to tighten the needle fixing nut firmly. This completes the needle position adjustment.
4. Adjusting the lever adjuster
By turning the lever adjuster in the center of the handpiece, you can adjust the tension when you pull the trigger button to your liking.
Looking at it from the back of the unit, turning it clockwise makes it lighter and turning it counterclockwise makes it heavier.
*When it becomes difficult to turn, it has reached its maximum position, so do not force it to turn any further.
5. Adjusting the needle stopper
When you pull the trigger, the needle retracts and paint sprays out. The range of movement of the trigger and needle is adjusted with the needle stopper. Turning it counterclockwise increases the pull, and turning it clockwise decreases it.
*Please adjust according to the application.
If the above steps do not solve the problem, we can inspect and repair the device for a fee. If you are interested, please contact our support.
<Caution>
*We do not respond to inquiries by phone.
* Reception hours are from 8:30am to 4pm on weekdays, and closed on Saturdays, Sundays, and holidays.
If you contact us outside of business hours or on weekends or holidays, we will respond on the next business day.
[Repair example] Paint does not come out after disassembly and cleaning (overhaul)
Hello! This is Raywood Customer Support. We receive inquiries about airbrushes in the following categories:
- Air problems (weak air, no air)
- Paint problems (paint not coming out, paint coming out poorly)
Most likely it is one of these two. In most cases, the reason for no air coming out is due to an abnormality in the compressor, such as a malfunction of the compressor (※Due to the nature of the compressor, it cannot be repaired, so we will deliver a new one).
On the other hand, "Air comes out but paint doesn't come out." In most cases, this is due to insufficient maintenance (insufficient cleaning) of the inside of the handpiece . This is especially true if you are in a situation where "Paint came out at first, but gradually it stopped coming out, and finally it stopped coming out completely." Please refer to the maintenance manual and perform maintenance yourself.
This time, we will explain in detail what to do when "air comes out but paint doesn't come out" using an actual handpiece that was returned to our company because "paint doesn't come out."
Symptoms of handpiece malfunction and confirmation of the actual product
After using it five times, the paint suddenly stopped coming out, and I've cleaned it many times but the paint still won't come out.
I tried replacing the needle and tip but it didn't work.
Before, when I gargled, I could just turn the nozzle a little, but now I have to turn it quite a bit.
(Note: It seemed as though the product had never been disassembled and cleaned, so we asked the customer to disassemble and clean it.)
I tried overhauling it while reading the instructions, but it didn't work.
Paint will come out, but the force is weaker than it was at first.
When we checked the actual product, there was no noticeable dirt on the exterior, only a little paint around the air adjuster.
When I checked the operation, I found that the spray was very weak, just as the customer said. Is this a defective product? I will take it apart and check for dirt inside.
Let's overhaul (disassemble and clean) your handpiece
There is a lot of paint stuck to the inside of the needle cap that is obvious at a glance.
By scraping the inside of the needle cap with a cotton swab dipped in thinner, a large amount of hardened paint was removed.

At this point I reassembled it and did a test spray, and it had recovered to the point where I could spray with almost no problems.
I continued to disassemble and clean each part. There was paint clumping around the needle guide.
When we cleaned the paint flow path of the handpiece body, we found a lot of paint had stuck to it.
After completing a complete overhaul, we reassembled it and checked it again, and it was found to be in perfect working order and could be used without any problems.
Reference) YouTube video explaining how to disassemble and clean an airbrush
summary
In conclusion, this was not a defective product. If you use general model paints such as lacquer, acrylic, or enamel paints, as long as you rinse your mouth thoroughly, the paint should not become so hardened after only five uses, so the main cause is thought to be that you did not rinse your mouth thoroughly after each use.
Also, if you feel that the bike is not working properly even a little, we can overhaul it (disassemble and clean) as in this case to remove any dirt from each part, grease it up, and then reassemble it to restore it to its original condition.
We sincerely ask that you do not dispose of the handpieces, but rather use them for a long time and take good care of them.
If you have any questions regarding disassembly and cleaning, please feel free to contact us using the form below.
<Caution>
*We do not respond to inquiries by phone.
* Reception hours are from 8:30am to 4pm on weekdays, and closed on Saturdays, Sundays, and holidays.
If you contact us outside of business hours or on weekends or holidays, we will respond on the next business day.
Air comes out but no paint comes out (after several uses)
If paint comes out at first, but gradually stops coming out, and eventually no paint comes out at all, the following may be the cause.
1. The needle and nozzle area is clogged.
2. The needle is not in the correct position.
3. The passages in the handpiece are clogged.
1. The needle or nozzle is dirty or clogged.
■ Needle dirt
When using the paint, paint will accumulate at the tip of the needle. Remove the paint with a cloth before painting. If the paint is not diluted enough, the tip will always be dirty. First, check and clean the needle.
If you use a paint that is not diluted enough, the nozzle may suddenly become clogged. If you have just bought the paint but the paint is not coming out, please check the dilution of the paint and whether the nozzle is clogged.
*We will explain how to dilute paint from around 7:30.
2. The needle is not positioned properly
If you operate the trigger with the needle retracted about 1 cm, paint will always come out.
With the handle still removed, loosen the needle lock nut and press down on the trigger to blow out air while moving the needle back and forth with your finger.
If you move the needle back more than 2cm at this time, paint will leak out into the handpiece, so please only move it back and forth about 1cm. The needle may be in the rear at the initial position, so if you have just bought it and paint is not coming out, first try pushing the needle forward and then gradually moving it back.
*We will explain how to adjust the needle position from around 10:30.
3. The passages in the handpiece are clogged.
If you have tried the above and paint still does not come out (if you have already used the machine with paint in it), it is likely that paint or debris has accumulated or clogged the nozzle or main passages. Please refer to the video below when disassembling and cleaning (overhauling).
It is also effective to soak each part in tool cleaner.
Even if you rinse your mouth and clean the needle every day, there is a possibility that small amounts of paint may remain and harden.
Please also see the maintenance manual that we have created.
*The password listed in the instruction manual is required to view the maintenance manual.
In addition, our company provides inspection and repair services for a fee, but approximately half of the inspection requests are for problems caused by insufficient cleaning.
We would like to introduce some repair examples, so please take a look.
<Caution>
*We do not respond to inquiries by phone.
* Reception hours are from 8:30am to 4pm on weekdays, and closed on Saturdays, Sundays, and holidays.
If you contact us outside of business hours or on weekends or holidays, we will respond on the next business day.
[Repair example] Paint does not come out after the second use
Here are some actual repair examples.
Inquiry Content
I took it apart and cleaned it but no paint came out.
I cleaned it as best I could with the brush provided.
After I was done, I tried adding just the thinner and spraying it, but only one drop dripped and then nothing was sprayed.
I can't even gargle.
If the dilution is not enough, will this happen after just one or two uses?
Symptoms of handpiece malfunction and confirmation of the actual product
Upon inspecting the actual item, there was no visible dirt, but there was a slight pliers scratch on the trigger tension dial.
When I checked to see if it worked, it didn't even work as a gargle, and no mist came out at all.
Overhaul the handpiece (disassemble and clean)

Cleaning the nozzle base (inside the body)
Paint residue was found inside the body. This is an area where paint residue is often found during repairs and inspections.

Needle does not pass
Paint had hardened inside the nozzle, preventing the needle from coming out.
I pressed a little harder and the needle came out.
The air adjuster dial was stuck with paint.
This caused the grease to run out and deteriorate, resulting in air leaks. Normally, paint would not get into this area, but if there is paint on the nozzle or nozzle cap, it will flow back and cause paint to leak out.
Paint was also stuck to the body side of the air adjuster.

The air flow path was stuck with paint.
There was also paint stuck to the inside of the nozzle cap.
<Caution>
*We do not respond to inquiries by phone.
* Reception hours are from 8:30am to 4pm on weekdays, and closed on Saturdays, Sundays, and holidays.
If you contact us outside of business hours or on weekends or holidays, we will respond on the next business day.
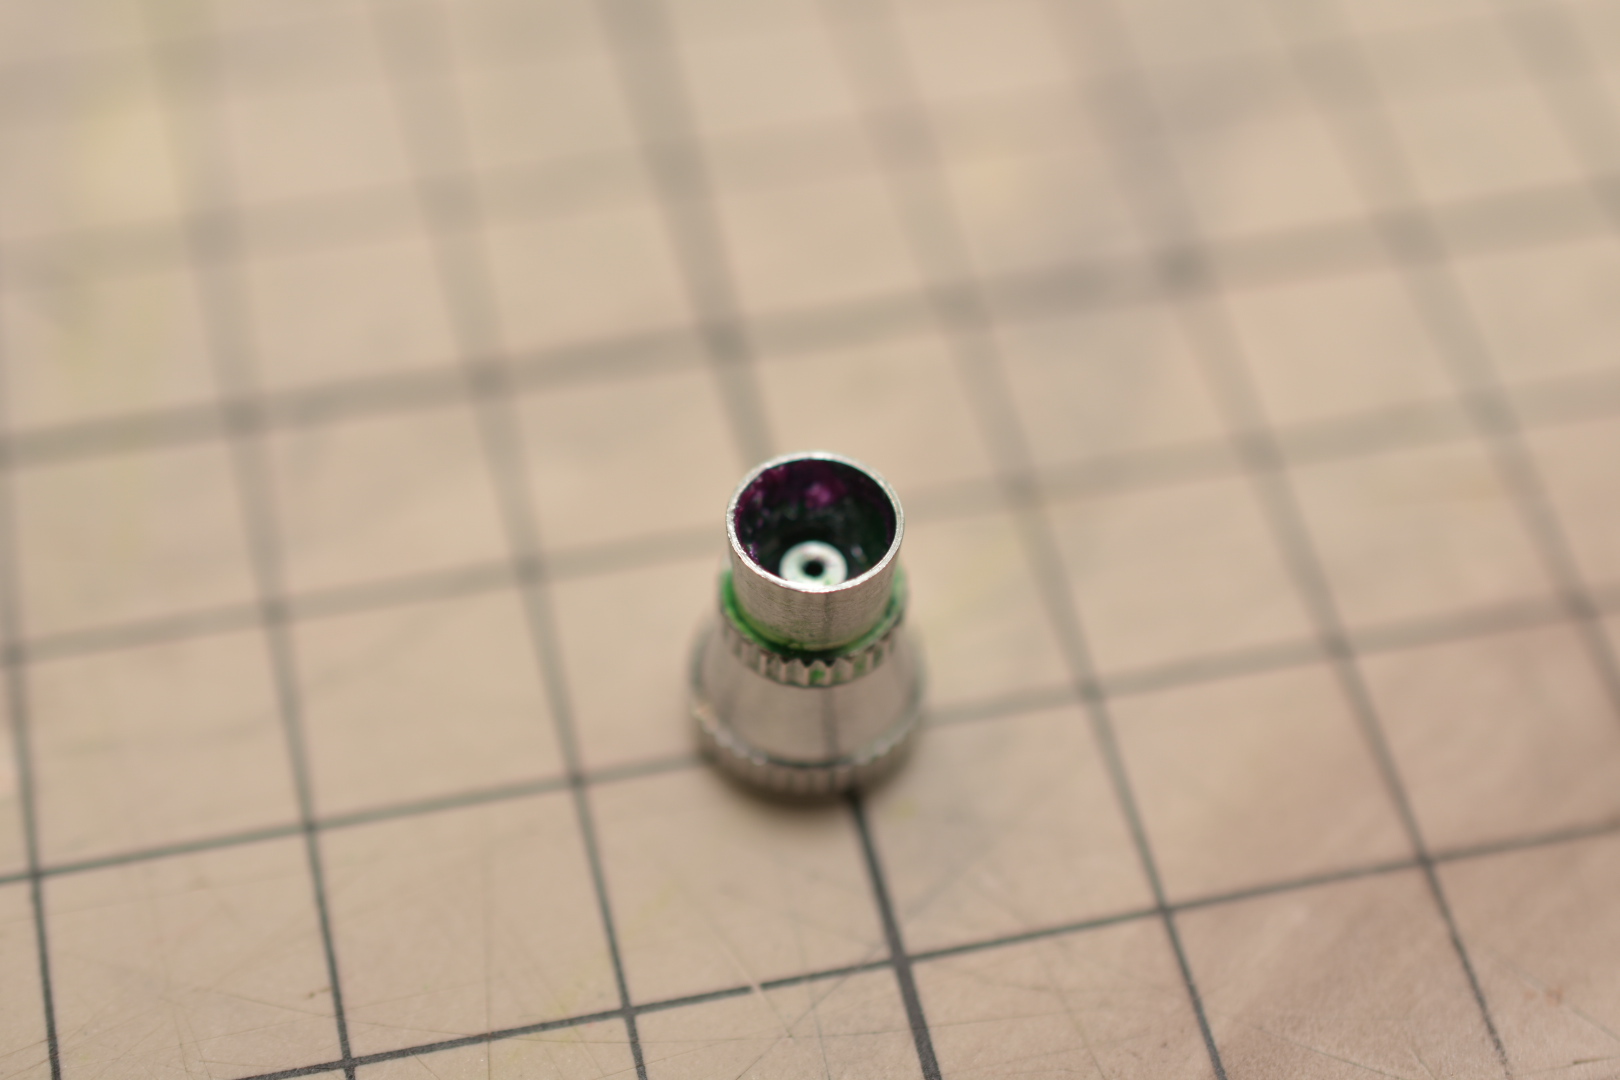
Product damage and parts sales
O-ring broke
Spares are available, please purchase from the link below.
The O-ring for the handle may break when it is placed between the handle and the main body.
This is probably true for many people, but even if they are missing it does not affect the functionality.
Additionally, we do not sell O-rings for air adjusters, either large or small.
<Caution>
*We do not respond to inquiries by phone.
* Reception hours are from 8:30am to 4pm on weekdays, and closed on Saturdays, Sundays, and holidays.
If you contact us outside of business hours or on weekends or holidays, we will respond on the next business day.
The needle was bent
We also sell repair kits that contain three needles and three nozzles, so please purchase them separately.
<Caution>
*We do not respond to inquiries by phone.
* Reception hours are from 8:30am to 4pm on weekdays, and closed on Saturdays, Sundays, and holidays.
If you contact us outside of business hours or on weekends or holidays, we will respond on the next business day.
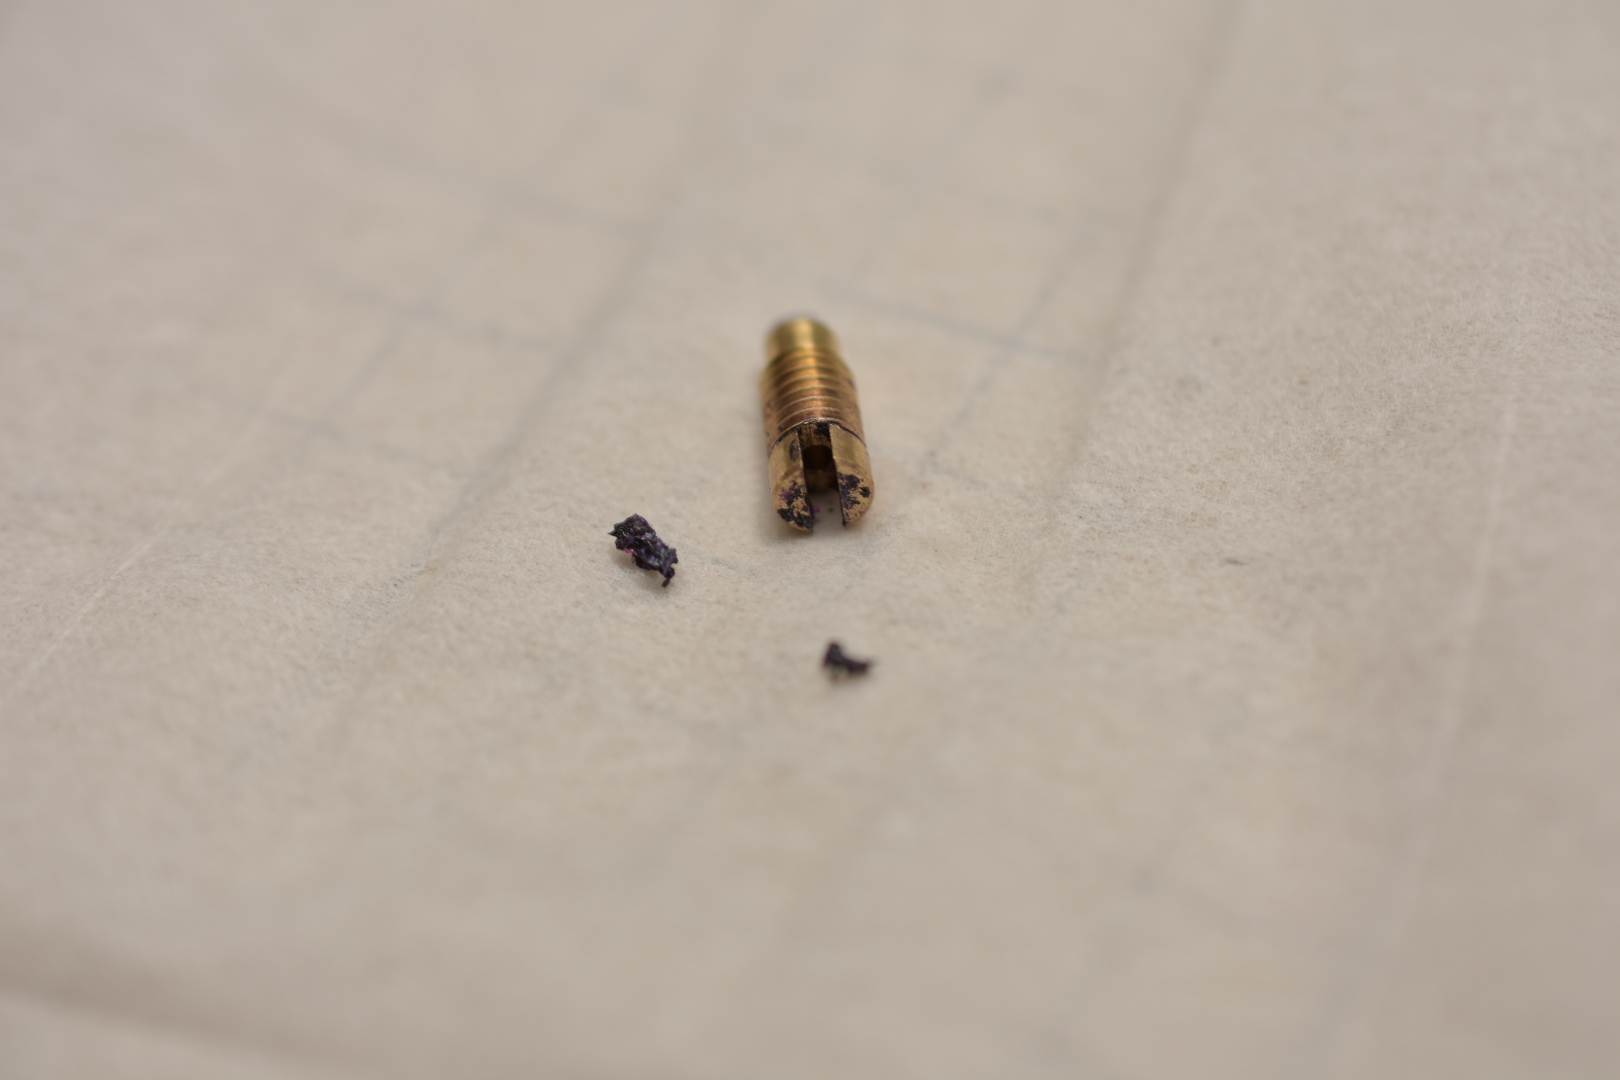
The nozzle was broken
The nozzle is a delicate part and the threads will break if force is applied.
Also, even if you say "the nozzle is broken," there are two patterns, which can be divided as follows.
1. If the nozzle breaks and falls out completely.
② If a broken piece of the nozzle (screw part) remains inside the handpiece.
First, please refer to the image below and check that no screw parts remain inside the handpiece.
1. If the nozzle breaks or falls out completely.
Please replace the nozzle with a new one. *Nozzles are not sold separately.
2. If a broken piece of the nozzle (screw part) remains inside the handpiece.
First, use the "Nozzle Rescue Tool" to remove the nozzle pieces.
After extraction, replace the nozzle.
The Nozzle Rescue Tool is included in the Airbrush Maintenance Kit.
*If you are unable to remove the nozzle fragments using the above method, please consider purchasing a new handpiece.
Frequently asked questions and inquiries
[RW-084] I want a spare in case of breakdown or loss
With the discontinuation of the "RW-084", sales and replacement of the compressor alone, the included charging cable, and the handpiece will no longer be available.
I'm sorry I couldn't be of help.
I hope you will consider changing your compressor.
*The handpiece included with "RW-084" requires a separate air valve joint.
Joint parts won't come off - [Official] PROFIX Airbrush by RAYWOOD
Once the joint parts are attached, they are difficult to remove due to the air pressure, but if you firmly grip them with pliers or something similar and turn them, they can be removed relatively easily.
If you pinch the product with pliers, the plating may come off, but this can be reduced by pinching the product with cloth or paper. We ask for your understanding in any minor scratches that may still occur.
*If you don't mind the plating peeling off, it may be easier to remove the joint parts by firmly gripping them with pliers or something similar and turning them, rather than using a cloth or other material between them.
Trigger button does not return well
I think there may be a lack of grease around the trigger.
The rod at the bottom of the trigger is designed to move up and down by passing through a circular rubber ring called an "O-ring" to ensure airtightness, but if the O-ring is new, it may occasionally become stiff until it breaks in.
Please try the following two steps.
① Move the trigger rod up and down by hand several times to break in the moving parts.
②If the problem persists, apply airbrush maintenance grease or spray-type grease such as KURE 5-56 to the gold part of the trigger and the lower rod part (inside the O-ring) (red part in the image below).
*Please wipe off any lubricant on the gold part of the trigger before applying the lubricant.
<Caution>
*We do not respond to inquiries by phone.
* Reception hours are from 8:30am to 4pm on weekdays, and closed on Saturdays, Sundays, and holidays.
If you contact us outside of business hours or on weekends or holidays, we will respond on the next business day.
Paint cup lid won't open
It seems that the lid of the included paint cup may become stuck due to air pressure changes during shipping.
Please try the following solutions:
・Slowly pull the lid up without turning it.
- Warm the cup and lid with a warm steamed towel.
-Wrap the cup in a towel and use a pair of wide-opening pliers to pull the lid off from directly above.
*Other users have reported that they were able to open it easily by tapping it lightly with a rubber hammer to give it some vibration.
We cannot be held responsible if the product becomes distorted due to being struck.
<Caution>
*We do not respond to inquiries by phone.
* Reception hours are from 8:30am to 4pm on weekdays, and closed on Saturdays, Sundays, and holidays.
If you contact us outside of business hours or on weekends or holidays, we will respond on the next business day.
The plastic cup does not fit securely into the handpiece and floats.
The plastic cups (large and small) included with RW-084 do not fit well with the handpiece #002, and the screw-in part on the handpiece that supports it is shallow, so it floats to a certain extent from the handpiece. (It feels like it is resting on the handpiece.)
*There will be a small gap between the O-ring and the plastic cup or handpiece.
<Caution>
*We do not respond to inquiries by phone.
* Reception hours are from 8:30am to 4pm on weekdays, and closed on Saturdays, Sundays, and holidays.
If you contact us outside of business hours or on weekends or holidays, we will respond on the next business day.
Use of hoses or handpieces made by other companies
GSI Creos' "Gundam Marker Airbrush System" can be connected with the following conversion joint.
*Only compatible with compressors with auto switch.
<Caution>
*We do not respond to inquiries by phone.
* Reception hours are from 8:30am to 4pm on weekdays, and closed on Saturdays, Sundays, and holidays.
If you contact us outside of business hours or on weekends or holidays, we will respond on the next business day.
About diluting paint
When spraying paint sold by various manufacturers with an airbrush, it is necessary to dilute the paint rather than using it as is.
This is only a guideline as it will vary depending on the type and ingredients, the diameter of the airbrush nozzle, the air pressure, and how long it has been since it was opened, but generally the ratio is about 2 to 3 parts solvent to 1 part paint.
In practice, the solvent is added with a dropper and mixed with a mixing stick to fine-tune the concentration.
Apply the paint to the edge of the plate so that it drips a little (it's best when it has the same viscosity as milk).
In addition, we recommend that you always use the paint in conjunction with the dedicated thinner (solvent) provided by each paint manufacturer.
*Please be careful when adding water to lacquer-based paints before use or trying to wash them with water after use, as they will harden.
* Metallic colors, surfacers under #1200, top coats, and special water-based paints such as acrylics are difficult to use because the pressure of our 0.3mm diameter handpiece and 22PSI compressor is weak and large particles tend to clog the nozzle.
If you are unable to dilute the paint properly and it becomes clogged, please refer to the video below to disassemble and clean it.
If the problem persists even after disassembly and cleaning, we also sell the handpiece separately, so please purchase one.
We also provide inspection and repair services for a fee, so if you would like this service, please contact us using the information below, and state your order number at the time of purchase.
<Caution>
*We do not respond to inquiries by phone.
* Reception hours are from 8:30am to 4pm on weekdays, and closed on Saturdays, Sundays, and holidays.
If you contact us outside of business hours or on weekends or holidays, we will respond on the next business day.
Precautions and checkpoints for handling handpieces
Please see the video we have created regarding how to handle the handpiece, precautions to take, and how to adjust each part.
#001 Tech Liner Series "From taking it out of the box to trying it out"
*This time we are using the TechLiner series, but the same applies to other series.
#002 Tech Liner Series "Adjustment and operation of each part" ~Adjustment of air adjuster, needle position, needle stopper~
Regarding requests for repairs and inspections
Please check the FAQ and try to repair it yourself.
If the situation does not improve after trying
Please contact our customer support with the necessary information.
*This service will be subject to a fee.
*We do not repair compressors.
<Required items>
- Request for inspection/repair
・Order number from official website, etc.
・Delivery address, postal code, name, and phone number
Details of the symptoms you are experiencing.
<Caution>
*We do not respond to inquiries by phone.
* Reception hours are from 8:30am to 4pm on weekdays, and closed on Saturdays, Sundays, and holidays.
If you contact us outside of business hours or on weekends or holidays, we will respond on the next business day.
Disassembly and cleaning
Gargling and Cleansing
"Gargle cleaning" is a very simple method to clean the inside of the handpiece cup. It is mainly done every time you change the color (paint) inside the cup.
*Please note that this does not remove paint stains from the inside of the handpiece.
*When you finish painting, please clean with a "tool cleaner" that is stronger than regular thinners. Please prepare a dedicated "tool cleaner" that matches the paint you are using.
1) Remove the paint cup lid and return any remaining paint to the paint container or discard it.
② Use tissue to wipe off any paint remaining on the inside of the paint cup.
③ Pour a small amount of cleaning solution into the paint cup. Using a dropper makes it easier to work reliably. After pouring, close the lid to prevent paint and cleaning solution from splashing. It is enough to have a small amount of solvent at the bottom of the paint cup.
④ Hold the tip of the handpiece with your fingers or loosen the nozzle cap 1 to 2 turns to prevent air from escaping.
5. Just like when painting, when you press the trigger, air flows back and bubbles appear in the paint cup. This process is commonly referred to as "rinsing" the airbrush.
⑥ Gargling will bring out the paint stains inside the handpiece. Gargle for a few seconds and repeat this process 2-3 times. Once the paint stains have been sufficiently removed, wipe off the cleaning solution with tissue or discard it.
⑦ If you have an old brush or cotton swab, you can soak it in cleaning solution and scrub the inside of the cup to clean it efficiently.
⑧ Wipe off any cleaning solution or paint on the inside of the paint cup with tissue or similar.
⑨ Repeat steps ① to ⑧ several times, while occasionally spraying a small amount of cleaning solution onto a tissue or similar to check if any paint color remains. Repeat until the dirt inside is sufficiently removed and no paint color remains even after spraying with cleaning solution. *The appropriate number of times will vary depending on the type of paint and the degree of dilution.
10. Finally, blow off all the cleaning solution.
*Please note that lacquer-based paints will harden if washed with water after use. Be sure to use a dedicated solvent (thinner/cleaning agent) for each paint.
*As mentioned above, the handpiece will not be cleaned by simply rinsing it repeatedly. It is necessary to disassemble and clean (overhaul) the handpiece after every few uses to thoroughly remove any paint stains that may have built up inside it.
If you have any questions, please contact us using the information below.
<Caution>
*We do not respond to inquiries by phone.
* Reception hours are from 8:30am to 4pm on weekdays, and closed on Saturdays, Sundays, and holidays.
If you contact us outside of business hours or on weekends or holidays, we will respond on the next business day.
How to Assemble the Handpiece
We have a video explaining how to assemble the handpiece, so please watch it from around 55:37 below.
If you find it difficult to assemble the item yourself, we also provide inspection and repair services for a fee, so please feel free to contact us.
<Caution>
*We do not respond to inquiries by phone.
* Reception hours are from 8:30am to 4pm on weekdays, and closed on Saturdays, Sundays, and holidays.
If you contact us outside of business hours or on weekends or holidays, we will respond on the next business day.
Disassembly and cleaning (overhaul) procedure
Please see the video above for instructions on how to disassemble and clean the unit.
*Each manufacturer sells "tool cleaners" that are stronger than regular thinners. Please prepare a dedicated "tool cleaner" that matches the paint you are using.
Once the parts have been disassembled, clean the fine details. Use thinner and tool cleaner to thoroughly clean each part with a cleaner brush or toothbrush. Wipe the needle and body with tissue or paper towel soaked in thinner.
- Soaking and cleaning the nozzle If there is any dirt that is stuck in the nozzle and cannot be removed, soak it in parts cleaner (known as "soaking it in a drain") and after a while, scrub off the dirt with a brush or similar.
Rubber O-rings (gaskets) will deteriorate, so please remove any that can be removed before soaking.
If you soak something in tool cleaner, be sure to dry it thoroughly afterwards.
Apply grease to each part Finally, apply a "sealant" to the screw part of the nozzle and "grease" to moving parts such as the trigger button to improve movement. You can also adjust the pull of the trigger button by applying grease.
If you have any questions about the video, please feel free to contact us using the form below.
<Caution>
*We do not respond to inquiries by phone.
* Reception hours are from 8:30am to 4pm on weekdays, and closed on Saturdays, Sundays, and holidays.
If you contact us outside of business hours or on weekends or holidays, we will respond on the next business day.
How to disassemble the handpiece
Please watch the first 20 minutes of the video below to see how to disassemble the handpiece.
<Caution>
*We do not respond to inquiries by phone.
* Reception hours are from 8:30am to 4pm on weekdays, and closed on Saturdays, Sundays, and holidays.
If you contact us outside of business hours or on weekends or holidays, we will respond on the next business day.
The lever adjuster (spring case) cannot be removed

The lever adjuster (spring case) is quite stiff, so if you are disassembling it for the first time, you will probably find it difficult without an adjustable wrench or 8mm spanner.
Firmly pinch the flat parts on both sides and turn.
You can use pliers, but there is a risk of damaging the parts, so we recommend using a cloth or tissue to hold the parts in place while disassembling them.
From the second time onwards, you will be able to assemble and disassemble it with your fingers.
We do not sell parts individually. Please be careful not to strip the threads.
<Caution>
*We do not respond to inquiries by phone.
* Reception hours are from 8:30am to 4pm on weekdays, and closed on Saturdays, Sundays, and holidays.
If you contact us outside of business hours or on weekends or holidays, we will respond on the next business day.
Handpiece exploded view and part names
troubleshooting
Gargle
1. Nozzle, nozzle cap, or head assembly is loose.
If the head assembly is even slightly loose, air will flow back and cause a gargling sound.
First, make sure to tighten the head assembly securely.
If the problem persists, please check to see if any of the assembly parts (nozzle, nozzle cap, needle cap, head) are loose.
2. Dirt on the handpiece
Is there any paint remaining on the nozzle cap or needle tip?
■Is the tip of the nozzle clogged with paint? Is the nozzle cracked or deformed?
■Does the nozzle come with an O-ring? Is it cracked or deteriorated?
■Is the needle bent or dirty?
*Please be careful not to tighten the nozzle too much as it will easily break.
In some cases the problem can be solved by disassembling and cleaning the entire unit or by replacing the nozzle and needle with new ones, so please refer to this.
3. The needle pull is small
If the needle stopper or spring case is tightened too much,
This reduces the needle's travel and causes air to flow back.
If you find yourself gargling, try loosening it a little.
Also, if the needle guide is too tight,
The needle will be tightened and will not move easily.
Please loosen this a little as well.
4. Paint dilution
Paint dilution varies depending on the type and ingredients.
Apply the paint to the edge of the plate so that it drips a little (it's best when it has the same viscosity as milk).
As a rough guideline, dilute the paint with 1 part paint to 2 to 3 parts solvent, add the solvent with a dropper, and mix with the mixing stick to fine-tune the concentration.
*Please be careful when adding water to lacquer-based paints before use or trying to wash them with water after use, as they will harden.
*Please note that special water-based paints such as metallic colors, surfacers (1200 grit or less), top coats, and acrylics do not have enough pressure with this 0.3mm diameter handpiece and 22 PSI compressor, and large particles may clog the paint, so care must be taken when using these paints.
It seems that anyone who is familiar with paints and has considerable experience with airbrushes should be able to spray it, if at all.
We also have a video explaining how to dilute the product, so please take a look if you are interested.
5. The center is off.
Center misalignment occurs when the nozzle base (the gold part where the nozzle is attached) is bent.
The base bends so that the needle comes into contact with the nozzle,
As a result, the air passage becomes blocked and causes backflow.
When removing parts (especially nozzles and head assemblies) with force,
The nozzle base is easily deformed, so please be careful not to use too much force when disassembling it.
We also have a nozzle center correction tool available, so please consider using it.
If the above steps do not solve the problem, we can inspect the problem for you, but this will incur a fee. If you would like to do this, please contact our support.
<Caution>
*We do not respond to inquiries by phone.
* Reception hours are from 8:30am to 4pm on weekdays, and closed on Saturdays, Sundays, and holidays.
If you contact us outside of business hours or on weekends or holidays, we will respond on the next business day.
The paint becomes clumpy
If the paint clumps, the main cause is likely to be the condition of the needle or dilution of the paint.
1. Needle condition
The needle may be dirty with paint or may be deformed.
First, check and clean the needle.
The tip of the needle can bend slightly if not handled with care. If this happens, we recommend purchasing a new one to replace it, as this will affect the paint spray.
*Needles are consumable items, so we recommend replacing them periodically.
We also sell repair kits that come with a set of three needles and three nozzles for the airbrushes we handle.
2. Adjusting the needle position
① Remove the needle stopper and handle by turning them counterclockwise.
② Turn the needle fixing nut counterclockwise to remove it.
③ The needle will be released and will be free to move.
In this state, move the needle backwards about 5 mm and then push it forward again until it stops firmly.
This will ensure the needle is in the correct position.
(*Please be careful not to push too hard as this may cause the nozzle to deform or become damaged.)
④ Reassemble in the reverse order of disassembly.
Be sure to tighten the needle fixing nut firmly to prevent the needle from slipping.
3. Adjusting the needle stopper
When you pull the trigger, the needle retracts and the paint sprays out.
The range of movement of this trigger and needle (the amount of paint sprayed) is adjusted with the needle stopper.
Turning it counterclockwise increases the pull, and turning it clockwise decreases it.
*Please adjust according to the application.
4. Paint dilution
The dilution ratio of paint varies depending on the type and ingredients, so it is just a rough guide, but the ratio is 1 part paint to 2 to 3 parts solvent. While adding the solvent with a dropper, mix with a color mixing stick to fine-tune the concentration. Apply the paint to the edge of the dish and it is best to have it drip a little (about the viscosity of milk).
*Please be careful when adding water to lacquer-based paints before use or trying to wash them with water after use, as they will harden.
*For special water-based paints such as metallic colors, surfacers (1200 grit or less), top coats, and acrylics, the pressure is weak when using a 0.3mm diameter handpiece and a 22PSI compressor, and large particles can easily become clogged.
Even those who are familiar with paints and have considerable experience with airbrushes will probably be able to apply this paint, if at all.
We also have a video explaining how to dilute the product, so please take a look if you are interested.
If the above steps do not solve the problem, we can inspect the problem for you, but this will incur a fee. If you would like to do this, please contact our support.
<Caution>
*We do not respond to inquiries by phone.
* Reception hours are from 8:30am to 4pm on weekdays, and closed on Saturdays, Sundays, and holidays.
If you contact us outside of business hours or on weekends or holidays, we will respond on the next business day.
I just bought it but the paint won't come out
1. Check the air outlet
Make sure the needle cap and nozzle cap are both tightly tightened. Turn them clockwise to tighten. Finger-tightening both screws should be sufficient.
If the nozzle cap (head assembly) is not tightened properly, air may leak and paint may not come out.
2. Adjusting the air adjuster
You can adjust the air flow rate (strength) by turning the air adjuster. The more you turn it counterclockwise from the fully tightened position, the more the air flow rate will increase. The adjustment range is very strict, and it will reach its maximum in about one turn from the fully tightened position. It is usually used at its maximum setting. Please adjust it according to the purpose, such as when you want to spray finely or create a thin paint finish.
※Please note※
Be careful not to loosen the air adjuster too much. Although there may be slight individual differences, the maximum is reached when loosened one turn from the fully tightened position. Do not loosen it more than two turns. If it is used when it is too loose, it may not function properly.
3. Adjusting the needle position
If the needle is not in the correct position, it will not spray properly. Check if the mist is not clear. Remove the handpiece from the compressor before proceeding. Turn the needle stopper and handle counterclockwise to remove them. Turn the needle fixing nut counterclockwise to remove it. The needle will be released and will be free to move. In this state, move the needle backwards by about 5 mm, then push it forward again until it stops firmly.
* Doing this will ensure that the needle fits into the correct position.
Finally, put it back in the reverse order. Be sure to tighten the needle fixing nut firmly. This completes the needle position adjustment.
4. Adjusting the lever adjuster
By turning the lever adjuster in the center of the handpiece, you can adjust the tension when you pull the trigger button to your liking.
Looking at it from the back of the unit, turning it clockwise makes it lighter and turning it counterclockwise makes it heavier.
*When it becomes difficult to turn, it has reached its maximum position, so do not force it to turn any further.
5. Adjusting the needle stopper
When you pull the trigger, the needle retracts and paint sprays out. The range of movement of the trigger and needle is adjusted with the needle stopper. Turning it counterclockwise increases the pull, and turning it clockwise decreases it.
*Please adjust according to the application.
If the above does not solve the problem, please contact support as the problem may be due to a manufacturing defect.
<Caution>
*We do not respond to inquiries by phone.
* Reception hours are from 8:30am to 4pm on weekdays, and closed on Saturdays, Sundays, and holidays.
If you contact us outside of business hours or on weekends or holidays, we will respond on the next business day.
[Repair example] Paint does not come out after disassembly and cleaning (overhaul)
Hello! This is Raywood Customer Support. We receive inquiries about airbrushes in the following categories:
- Air problems (weak air, no air)
- Paint problems (paint not coming out, paint coming out poorly)
Most likely it is one of these two. In most cases, the reason for no air coming out is due to an abnormality in the compressor, such as a malfunction of the compressor (※Due to the nature of the compressor, it cannot be repaired, so we will deliver a new one).
On the other hand, "Air comes out but paint doesn't come out." In most cases, this is due to insufficient maintenance (insufficient cleaning) of the inside of the handpiece . This is especially true if you are in a situation where "Paint came out at first, but gradually it stopped coming out, and finally it stopped coming out completely." Please refer to the maintenance manual and perform maintenance yourself.
This time, we will explain in detail what to do when "air comes out but paint doesn't come out" using an actual handpiece that was returned to our company because "paint doesn't come out."
Symptoms of handpiece malfunction and confirmation of the actual product
After using it five times, the paint suddenly stopped coming out, and I've cleaned it many times but the paint still won't come out.
I tried replacing the needle and tip but it didn't work.
Before, when I gargled, I could just turn the nozzle a little, but now I have to turn it quite a bit.
(Note: It seemed as though the product had never been disassembled and cleaned, so we asked the customer to disassemble and clean it.)
I tried overhauling it while reading the instructions, but it didn't work.
Paint will come out, but the force is weaker than it was at first.
When we checked the actual product, there was no noticeable dirt on the exterior, only a little paint around the air adjuster.
When I checked the operation, I found that the spray was very weak, just as the customer said. Is this a defective product? I will take it apart and check for dirt inside.
Let's overhaul (disassemble and clean) your handpiece
There is a lot of paint stuck to the inside of the needle cap that is obvious at a glance.
By scraping the inside of the needle cap with a cotton swab dipped in thinner, a large amount of hardened paint was removed.
At this point I reassembled it and did a test spray, and it had recovered to the point where I could spray with almost no problems.
I continued to disassemble and clean each part. There was paint clumping around the needle guide.
When we cleaned the paint flow path of the handpiece body, we found a lot of paint had stuck to it.
After completing a complete overhaul, we reassembled it and checked it again, and it was found to be in perfect working order and could be used without any problems.
Reference) YouTube video explaining how to disassemble and clean an airbrush
summary
In conclusion, this was not a defective product. If you use general model paints such as lacquer, acrylic, or enamel paints, as long as you rinse your mouth thoroughly, the paint should not become so hardened after only five uses, so the main cause is thought to be that you did not rinse your mouth thoroughly after each use.
Also, if you feel that the bike is not working properly even a little, we can overhaul it (disassemble and clean) as in this case to remove any dirt from each part, grease it up, and then reassemble it to restore it to its original condition.
We sincerely ask that you do not dispose of the handpieces, but rather use them for a long time and take good care of them.
If you have any questions regarding disassembly and cleaning, please feel free to contact us using the form below.
<Caution>
*We do not respond to inquiries by phone.
* Reception hours are from 8:30am to 4pm on weekdays, and closed on Saturdays, Sundays, and holidays.
If you contact us outside of business hours or on weekends or holidays, we will respond on the next business day.
Paint leaks from the handpiece
Paint may drip from the tip of the nozzle or leak from around the trigger button or handle.
1. If paint drips from the tip of the nozzle
The needle is often the culprit.
■Needle condition: Check that the needle is not dirty with paint or bent.
■ Adjusting the needle position
(1) Remove the needle stopper and handle by turning them counterclockwise.
(2) Turn the needle fixing nut counterclockwise to remove it.
(3) The needle is released and becomes free.
In this state, move the needle backwards about 5 mm and then push it forward again until it stops firmly.
This will ensure the needle is in the correct position.
(*Please be careful not to push too hard as this may cause the nozzle to deform or become damaged.)
④ Reassemble in the reverse order of disassembly.
Be sure to tighten the needle fixing nut firmly to prevent the needle from slipping.
*We will explain how to adjust the needle position from around 10:30.
2. If paint leaks onto the trigger or handle
Try using a flat head screwdriver to tighten the needle guide a little more firmly.
This compresses the needle guide gasket, causing it to fit tightly against the needle.
In most cases, this will prevent leaks.
In addition, the needle guide gasket is a consumable item. If leakage is observed even after tightening it firmly, please replace the gasket.
*The O-ring set below is for RAYWOOD handpiece #002 only, but the needle guide gasket is compatible with PROFIX, so please rest assured.
*When you perform this procedure, you will feel resistance as you insert the needle, but this is an indication that the adhesion has improved.
*We explain how to adjust the needle guide in the first 15 minutes and from around 1:09:25.
If you have tried each of the above and paint is still leaking, or if you notice a problem after first use, this may be a manufacturing defect, so please contact us using the form below.
We also sell the handpiece separately.
<Caution>
*We do not respond to inquiries by phone.
* Reception hours are from 8:30am to 4pm on weekdays, and closed on Saturdays, Sundays, and holidays.
If you contact us outside of business hours or on weekends or holidays, we will respond on the next business day.
Air comes out but no paint comes out (after several uses)
If paint comes out at first, but gradually stops coming out, and eventually no paint comes out at all, the following may be the cause.
1. The needle and nozzle area is clogged.
2. The needle is not in the correct position.
3. The passages in the handpiece are clogged.
1. The needle or nozzle is dirty or clogged.
■Needle stains When using the product, paint will accumulate at the tip of the needle. Remove the paint with a cloth before painting. If the product is not diluted enough, the tip will always be dirty.
■Needle cap, inside of nozzle cap, and nozzle dirt Paint may adhere to the inside of the needle cap and nozzle cap and prevent normal spraying. If it gets dirty, it will be difficult to spray normally. Clean the dirty parts with a special tool or cotton swab.
If you use a paint that is not diluted enough, the nozzle may suddenly become clogged. If you have just bought the paint but the paint is not coming out, please check the dilution of the paint and whether the nozzle is clogged.
*We will explain how to dilute paint from around 7:30.
2. The needle is not positioned properly
If you operate the trigger with the needle retracted about 1 cm, paint will always come out.
With the handle still removed, loosen the needle lock nut and press down on the trigger to blow out air while moving the needle back and forth with your finger.
If you move the needle back more than 2cm at this time, paint will leak out into the handpiece, so please only move it back and forth about 1cm. The needle may be in the rear at the initial position, so if you have just bought it and paint is not coming out, first try pushing the needle forward and then gradually moving it back.
*We will explain how to adjust the needle position from around 10:30.
3. The passages in the handpiece are clogged.
If you have tried the above and paint still does not come out (if you have already used the machine with paint in it), it is likely that paint or debris has accumulated or clogged the nozzle or main passages. Please refer to the video below when disassembling and cleaning (overhauling).
It is also effective to soak each part in tool cleaner.
Even if you rinse your mouth and clean the needle every day, there is a possibility that small amounts of paint may remain and harden.
Please also see the maintenance manual that we have created.
*The password listed in the instruction manual is required to view the maintenance manual.
In addition, our company provides inspection and repair services for a fee, but approximately half of the inspection requests are for problems caused by insufficient cleaning.
We would like to introduce some repair examples, so please take a look.
<Caution>
*We do not respond to inquiries by phone.
* Reception hours are from 8:30am to 4pm on weekdays, and closed on Saturdays, Sundays, and holidays.
If you contact us outside of business hours or on weekends or holidays, we will respond on the next business day.
[Repair example] Paint does not come out after the second use
Here are some actual repair examples.
Inquiry Content
I took it apart and cleaned it but no paint came out.
I cleaned it as best I could with the brush provided.
After I was done, I tried adding just the thinner and spraying it, but only one drop dripped and then nothing was sprayed.
I can't even gargle.
If the dilution is not enough, will this happen after just one or two uses?
Based on the above, we have referred you to the FAQ below, but as this has not improved the situation, we will recall the defective handpiece and take a closer look at the cause.
[Repair example] Paint does not come out after the second useSymptoms of handpiece malfunction and confirmation of the actual product
Upon inspecting the actual item, there was no visible dirt, but there was a slight pliers scratch on the trigger tension dial.
When I checked to see if it worked, it didn't even work as a gargle, and no mist came out at all .
Overhaul the handpiece (disassemble and clean)
Cleaning the nozzle base (inside the body)
Paint residue was found inside the body. This is an area where paint residue is often found during repairs and inspections.
Needle does not pass
Paint had hardened inside the nozzle, preventing the needle from coming out.
I pressed a little harder and the needle came out.
The air adjuster dial was stuck with paint.
This caused the grease to run out and deteriorate, resulting in air leaks. Normally, paint would not get into this area, but if there is paint on the nozzle or nozzle cap, it will flow back and cause paint to leak out.
Paint was also stuck to the body side of the air adjuster.
The air flow path was stuck with paint.
There was also paint stuck to the inside of the nozzle cap.
Checking operation after disassembly and cleaning
I cleaned it and put it back together but it still didn't work perfectly.
It appears that the remaining paint has hardened inside and cannot be restored even by cleaning.
I hope this incident has made it clear that insufficient cleaning can render a handpiece unusable even after just one or two uses.
The instruction manual states that "please disassemble and clean the product after approximately 10 uses," but if you notice any problems, please disassemble and clean the product regardless of the number of times it has been used.
Also, to ensure long-term use of your handpiece, be sure to stock maintenance supplies.
The video also explains how to disassemble and clean (overhaul), so please check it out if you are using an airbrush for the first time.
<Caution>
*We do not respond to inquiries by phone.
* Reception hours are from 8:30am to 4pm on weekdays, and closed on Saturdays, Sundays, and holidays.
If you contact us outside of business hours or on weekends or holidays, we will respond on the next business day.
Product damage and parts sales
The O-ring broke
Spares are available, please purchase from the link below.
The O-ring for the handle often breaks when it is sandwiched between the handle and the main body, but even if it is missing, it will not affect the function.
Additionally, we do not sell O-rings for air adjusters, either large or small.
<Caution>
*We do not respond to inquiries by phone.
* Reception hours are from 8:30am to 4pm on weekdays, and closed on Saturdays, Sundays, and holidays.
If you contact us outside of business hours or on weekends or holidays, we will respond on the next business day.
The needle was bent
We also sell repair kits that contain three needles and three nozzles, so please purchase them separately.
<Caution>
*We do not respond to inquiries by phone.
* Reception hours are from 8:30am to 4pm on weekdays, and closed on Saturdays, Sundays, and holidays.
If you contact us outside of business hours or on weekends or holidays, we will respond on the next business day.
The nozzle was broken
The nozzle is a delicate part and the threads will break if force is applied.
Also, even if you say "the nozzle is broken," there are two patterns, which can be divided as follows.
1. If the nozzle breaks and falls out completely.
② If a broken piece of the nozzle (screw part) remains inside the handpiece.
First, please refer to the image below and check that no screw parts remain inside the handpiece.
1. If the nozzle breaks or falls out completely.
Please replace the nozzle with a new one. *Nozzles are not sold separately.
2. If a broken piece of the nozzle (screw part) remains inside the handpiece.
First, use the "Nozzle Rescue Tool" to remove the nozzle pieces.
After extraction, replace the nozzle.
The Nozzle Rescue Tool is included in the Airbrush Maintenance Kit.
*If you are unable to remove the nozzle fragments using the above method, please consider purchasing a new handpiece.
NITRO-COMP V1
The meter reading suddenly increases or decreases
There may be an air leak.
We apologize for the inconvenience, but please contact our support team and attach a video of the problem.
<Caution>
*We do not respond to inquiries by phone.
* Reception hours are from 8:30am to 4pm on weekdays, and closed on Saturdays, Sundays, and holidays.
If you contact us outside of business hours or on weekends or holidays, we will respond on the next business day.
No power
First, is the plug inserted?
If you are using a multi-tap or adapter, make sure they are turned on.
Due to its specifications, if the regulator pressure adjustment dial is set to minimum, the device will not operate even when turned on.
Please try the following solutions:
1. Remove the hoses, release the air, and turn on the power switch. 2. Unlock the pressure adjustment dial (pull up the dial).
③Continue turning the pressure adjustment dial clockwise. *Air may not come out if you do not turn it for 1 to 2 minutes. Keep turning it until air comes out.
<Caution>
*We do not respond to inquiries by phone.
* Reception hours are from 8:30am to 4pm on weekdays, and closed on Saturdays, Sundays, and holidays.
If you contact us outside of business hours or on weekends or holidays, we will respond on the next business day.
Water comes out of the handpiece while painting
The moisture removal function of the regulator included with NITRO-COMP V1 and V2 "reduces the ingress of moisture" but does not "prevent the ingress of moisture."
In addition, moisture is generated inside the hose,
Therefore, we recommend that you install a filter with moisture removal function between the hose and the handpiece.
<Caution>
*We do not respond to inquiries by phone.
* Reception hours are from 8:30am to 4pm on weekdays, and closed on Saturdays, Sundays, and holidays.
If you contact us outside of business hours or on weekends or holidays, we will respond on the next business day.
The handpiece stand was/is damaged
If the handpiece stand is damaged,
Please contact support using the form below.
Since it is made of resin, it may be damaged if solvents penetrate it.
If it is damaged, please purchase a new one.
<Caution>
*We do not respond to inquiries by phone.
* Reception hours are from 8:30am to 4pm on weekdays, and closed on Saturdays, Sundays, and holidays.
If you contact us outside of business hours or on weekends or holidays, we will respond on the next business day.
Air tank T-25
The handpiece stand was/is damaged
Pull the dial up and then try turning it.
If it does not turn even when pulled up, or if the dial is unusually stiff, please contact our support.
<Caution>
*We do not respond to inquiries by phone.
* Reception hours are from 8:30am to 4pm on weekdays, and closed on Saturdays, Sundays, and holidays.
If you contact us outside of business hours or on weekends or holidays, we will respond on the next business day.
Compressor pressure settings when connecting to a tank
■When connecting NITRO-COMP V1 When using "NITRO-COMP V1" and "T-25" together, the following numerical settings are the basic settings.
Compressor side: Maximum output ( 4 bar )
- Tank side: Set the output you want to use as the rated output.
■When connecting a stationary compressor other than V1 <br>Basically, the compressor outputs at the maximum value allowed by the tank input side,
The rated output from the handpiece is adjusted on the output side of the tank.
The maximum input for the T-25 is 7 bar . When it reaches 7 bar, the safety valve will operate.
Therefore, please set the compressor output to less than 7 bar.
<Caution>
*We do not respond to inquiries by phone.
* Reception hours are from 8:30am to 4pm on weekdays, and closed on Saturdays, Sundays, and holidays.
If you contact us outside of business hours or on weekends or holidays, we will respond on the next business day.
Brown water came out when draining
Pieces of solder in the tank and oil applied to the mechanism may dissolve into the water.
Depending on the storage environment, rust may occur and the discharged water may turn brownish.
This is because the inside of the tank is not rust-proofed.
It can occur in any individual,
There will be no impact on use.
After use, remove the drain cock and leave it open until the next use.
Store in a dry place.